Me

How To: VIMP Media Player

4. September 2019
How To: VIMP Medienplayer

In the previous blog post we introduced the intial configuration of VIMP. In this article we explain how to use the VIMP media player to present your videos appropriately. We reveal you everything worth knowing about the functions of the media player and how you can use the VIMP Player in an uncomplicated way.

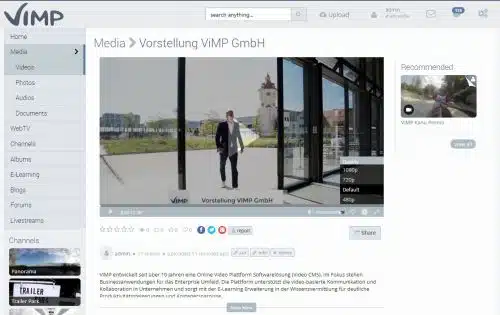
By default VIMP uses our powerful HTML5 player. The settings of this player can be adjusted in many ways, such as the quality level selector or the option to select different templates. All basic settings can be defined in the VIMP configuration.

Quality levels

In the frontend the VIMP Player has also different functions ready for you. For example, it is possible to freely select the video resolutions (quality levels) defined by you in advance via the quality level selector. During the playback of a video, the player automatically scales to the best available video resolution, depending on the available bandwidth. By connecting a streaming server, such as Wowza, VIMP also supports Adaptive Bitrate Streaming (ABR) for an even smoother transition from one quality level to the next. This ensures a flawless and smooth playback of your media.

Player design

For an individual design of your video portal, the player design can also be adapted to your individual requirements. Thus you have the additional possibility via CSS to adapt the VIMP Player to your style guide (corporate design).

Subdivision of contents

But the videos should not only be prepared for you in an optimal and manageable way. In the VIMP media player you can divide your video into several chapters with jump marks under the player, in order to guarantee your colleagues and coworkers more clarity. Chapter markers can also be provided with titles so that relevant information can be accessed directly during knowledge transfer.

Video Editor extension

With the video editor extension of the VIMP Player you can add the final touch to your video before it goes online. The editor gives you the ability to edit videos, change speed, apply a predefined template and create picture-in-picture videos, as well as add consistent intros and outros.

For more information or questions please contact us via our contact form or by phone at +49 (0)89 1200 1020!

VIMP Installation Service

Leave the complete installation process of your VIMP platform to us.


The VIMP installation service includes:

To access your server from the outside, we need the following:

We recommend Linux as operating system. An installation under UNIX, BSD or Windows is also possible, but is not officially supported by us.

Minimum server requirements for installing VIMP:

Webserver

PHP

MySQL/MariaDB

Transcoding
Please install the transcoding tools exactly as described in the documentation. Installing the standard packages is not sufficient due to patent regulations.

CSS modifications
To concatenate modified CSS files, npm must be installed.

Hardware

As a minimum requirement we recommend:

For productive use we recommend:

We recommend using a RAID controller for additional data security.

VIMP Installationsservice

Ãœberlassen Sie den kompletten Installationsprozess Ihrer VIMP-Plattform uns.


Der VIMP Installationsservice beinhaltet:

  • Vorbereitung Ihres Servers
  • Installation der erworbenen VIMP Software
  • Installation der Transcoding Tools

Um von außen auf Ihren Server zugreifen zu können, benötigen wir folgendes:

  • SSH-Zugriff auf Ihren Server (idealerweise als root)
  • Vorinstalliertes Hosting (Apache + MySQL/MariaDB)

Wir empfehlen Linux als Betriebssystem. Eine Installation unter UNIX, BSD oder Windows ist ebenfalls möglich, wird von uns aber nicht offiziell unterstützt.

Minimale Servervoraussetzungen für die Installation von VIMP:

Webserver

  • Apache2
    • Version 2.4 empfohlen
  • oder NGINX

PHP

  • Version 7.1 – 8.0
  • GD-Bibliothek, openssl, cURL, MySQL, mbstring, PDO, pdo_mysql und XSL-Erweiterungen müssen installiert sein
  • PHP CLI (Command Line Interface) muss installiert sein
  • SourceGuardian Extension (außer für ViMP Ultimate Extended)

MySQL/MariaDB

  • MySQL: Version 5.7 – 8.0
  • MariaDB: Mindestens Version 10.2
  • InnoDB muss installiert sein

Transcoding
Die Transcoding-Tools bitte genau wie in der Dokumentation beschrieben installieren. Die Installation der Standardpakete ist aufgrund patentrechtlicher Bestimmungen nicht ausreichend.

  • FFmpeg
  • FFProbe
  • exiftool (>10.8)
  • time

CSS-Anpassungen
Um modifizierte CSS-Dateien zu verketten, muss npm installiert sein.

Hardware

Als Mindestanforderung empfehlen wir:

  • Quad-Core-Prozessor
  • 8 GB RAM
  • 500 GB Festplattenspeicher (die benötigte Größe hängt im Wesentlichen von der Medienzahl ab)

Für den produktiven Einsatz empfehlen wir:

  • Hexa-Core-Prozessor oder besser (mehr Kerne ermöglichen insbesondere eine schnellere Transcodierung der Medien)
  • 32 GB RAM oder mehr
  • 2000 GB Festplattenspeicher oder mehr (die benötigte Größe hängt im Wesentlichen von der Medienzahl ab)

Wir empfehlen die Verwendung eines RAID-Controllers für zusätzliche Datensicherheit.

Kontakt aufnehmen

"*" indicates required fields

This field is for validation purposes and should be left unchanged.

Request demo

"*" indicates required fields

This field is for validation purposes and should be left unchanged.

Contact us

"*" indicates required fields

This field is for validation purposes and should be left unchanged.

Demo anfordern

"*" indicates required fields

This field is for validation purposes and should be left unchanged.

Kontakt aufnehmen

"*" indicates required fields

This field is for validation purposes and should be left unchanged.